
How to use a kettlebell safely

Kettlebells are effective because they reward good mechanics and punish sloppy ones. That makes them useful for home training, but it also means beginners should treat technique as the priority, not the weight on the handle.
If you’re returning to exercise after a break, the safest way in is simple: learn the hinge, use a light bell, and keep the first few sessions boring. A controlled deadlift tells you far more about readiness than a flashy swing.
[IMAGE PLACEHOLDER]
Quick safety basics for beginners
Before you do a single rep, set three rules:
- No sharp pain, numbness, dizziness, or loss of control. Stop immediately if any of those show up.
- Use a weight you can control for multiple clean reps. If your posture changes on rep two or three, the bell is too heavy for now.
- Learn two-handed movements first. They are easier to control than one-handed or overhead work.
A kettlebell session should feel challenging in the muscles and breathing, not risky in the joints. If your lower back starts doing the work that your hips should be doing, or your shoulder feels jammed instead of stable, the set has gone past a useful point.
How to choose the right first kettlebell
The best first kettlebell is the one that lets you learn technique without compensation. That usually means choosing a lighter bell than the one you think you “should” use.
A practical starting rule for absolute beginners: if you are choosing between two nearby weights, pick the lighter one unless you can deadlift the heavier bell for 5 clean reps with a neutral spine, steady grip, and no change in posture. If you have to shrug, round, lean back, or rush the descent, go lighter.
A simple test: pick a weight you can deadlift from the floor with a neutral spine, stand up smoothly, and lower it back down under control for several reps. If your back rounds, your shoulders shrug, or the bell drags you forward, the load is too ambitious.
Light vs. moderate weight
A lighter kettlebell is the safer choice when:
– you are new to kettlebells,
– you are returning after a layoff,
– your grip is still adapting,
– or you want to learn a new movement pattern.
A moderate kettlebell can make sense when:
– deadlifts already feel solid and repeatable,
– you can keep your brace without holding your breath awkwardly,
– and the bell still moves with control during every rep.
The trade-off is straightforward. Light weight makes technique easier to learn, but it can feel too easy once your form is stable. Moderate weight gives more training stimulus, but it exposes mistakes faster. Beginners usually benefit more from the first option.
One kettlebell or two?
For safe beginner training, one kettlebell is enough. In fact, starting with one bell is often better because it keeps the setup simple and lets you focus on position, grip, and breathing.
Two kettlebells are useful later, but they also double the coordination demand. If you are still learning the hinge or the rack position, one bell is the better teaching tool.
Set up your space and equipment safely
A kettlebell workout needs more than just floor space. You want a setup that reduces distractions and reduces the chance of slips, collisions, or awkward catches.
Check these basics before you begin:
- Flooring: use a stable, non-slip surface.
- Space: leave enough room to hinge, stand, and swing the bell without hitting furniture, walls, or low ceilings.
- Footwear: flat, stable shoes are usually better than soft running shoes. Barefoot can also work for some people if the floor is safe and non-slip.
- Equipment condition: inspect the handle and body of the kettlebell for damage, chips, or instability.
For home exercisers, this matters more than it sounds. A cramped corner encourages awkward swings. A soft shoe can make your feet wobble. A damaged handle can change how the bell sits in your hand.
Warm up before you lift
A warm-up does not need to be long, but it should prepare the hips, trunk, and shoulders for hinging and holding load.
Use this simple sequence:
- March in place or walk briskly for a minute or two.
- Do a few bodyweight hip hinges with hands on the hips so you can feel the movement.
- Perform bodyweight squats or shallow goblet-squat rehearsals.
- Circle the shoulders gently and take a few controlled breaths.
The goal is not to stretch everything aggressively. The goal is to make the first loaded rep feel like a continuation of the warm-up instead of a cold start. That is especially helpful if you are training first thing in the morning or after a long desk session.
Learn the core safety mechanics: hinge, brace, and neutral spine
Most kettlebell mistakes come from losing one of three things: the hip hinge, core brace, or neutral spine.
The hip hinge
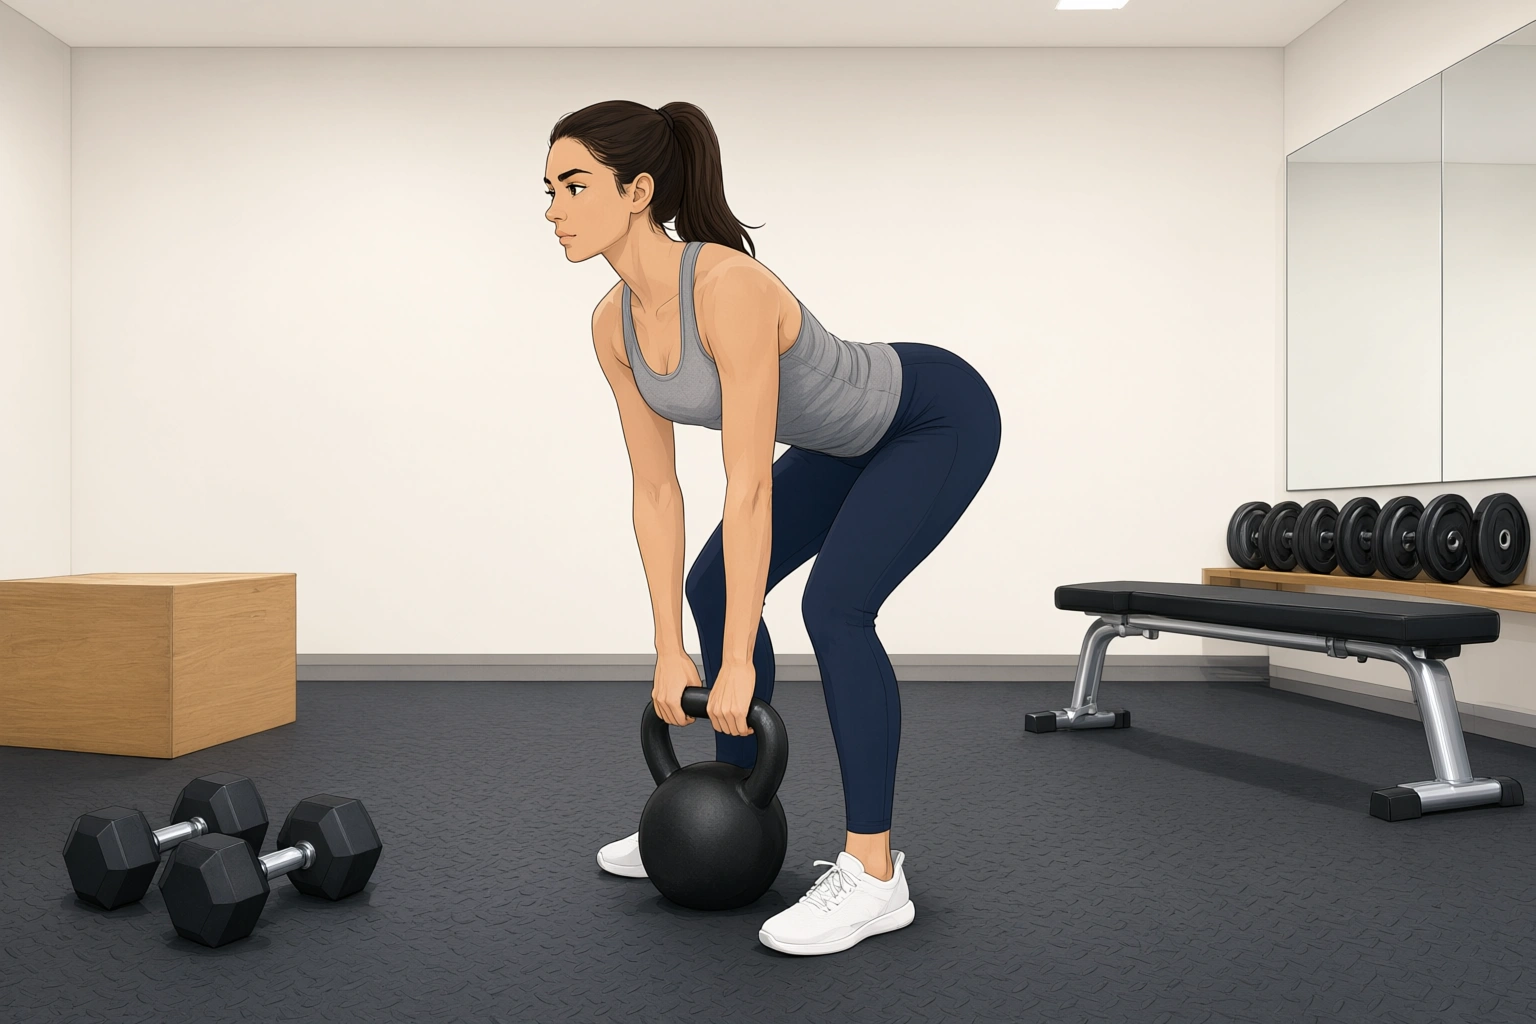
A hinge is a hip-dominant movement. Your hips move back while your torso inclines forward, but the spine stays controlled. Think of closing a car door with your hips rather than reaching for the floor with your shoulders.
A useful cue from beginner kettlebell instruction is to stand with the kettlebell between your feet, then push the hips back while keeping the shoulders above the hands and the elbows straight. That setup helps you load the hips instead of folding through the lower back. A firm grip also helps keep the bell from drifting.
Neutral spine
Neutral spine means your back stays long and organized rather than rounded or overarched. It does not mean rigid. You still move, but the movement comes from the hips and shoulders, not from collapsing through the lumbar spine.
If you cannot keep the back position while reaching for the bell, the weight is too low, too far away, or too heavy for your current pattern.
Bracing
Bracing is the act of tightening the trunk before the rep so your torso stays stable under load. A simple cue is to take a breath into the ribs and abdomen, then tighten the midsection as if preparing for a light bump.
You do not need to strain or hold your breath for every movement. You do need enough tension that the torso does not wobble when the bell moves.

Safe beginner exercises: deadlift first, then swing
If you are new to kettlebells, the safest place to begin is usually the deadlift. It teaches the hinge without the speed and timing demands of the swing.
Two-hand kettlebell deadlift
This is the most useful starter movement for many beginners.
How to do it:
– Stand with your feet a bit wider than shoulder-width, or about hip-width if that feels more stable.
– Place the kettlebell on the floor between your feet.
– Hinge your hips back and reach down with a straight back.
– Keep your shoulders above your hands and your elbows straight.
– Grip the handle firmly.
– Stand up by driving through the feet and extending the hips.
– Lower the bell with control.
A beginner kettlebell guide from Girls Gone Strong describes the setup this way: feet a bit wider than shoulder-width, toes slightly out, bell between the feet, shoulders above the hands, elbows straight, eyes forward, and a tight grip. Those cues are useful because they keep the lift organized from the start.
What it should feel like: the glutes and hamstrings do most of the work. Your lower back should not feel like the primary engine.
Two-hand kettlebell swing
The swing is more dynamic and more technical than the deadlift. It is not a first-day movement for everyone.
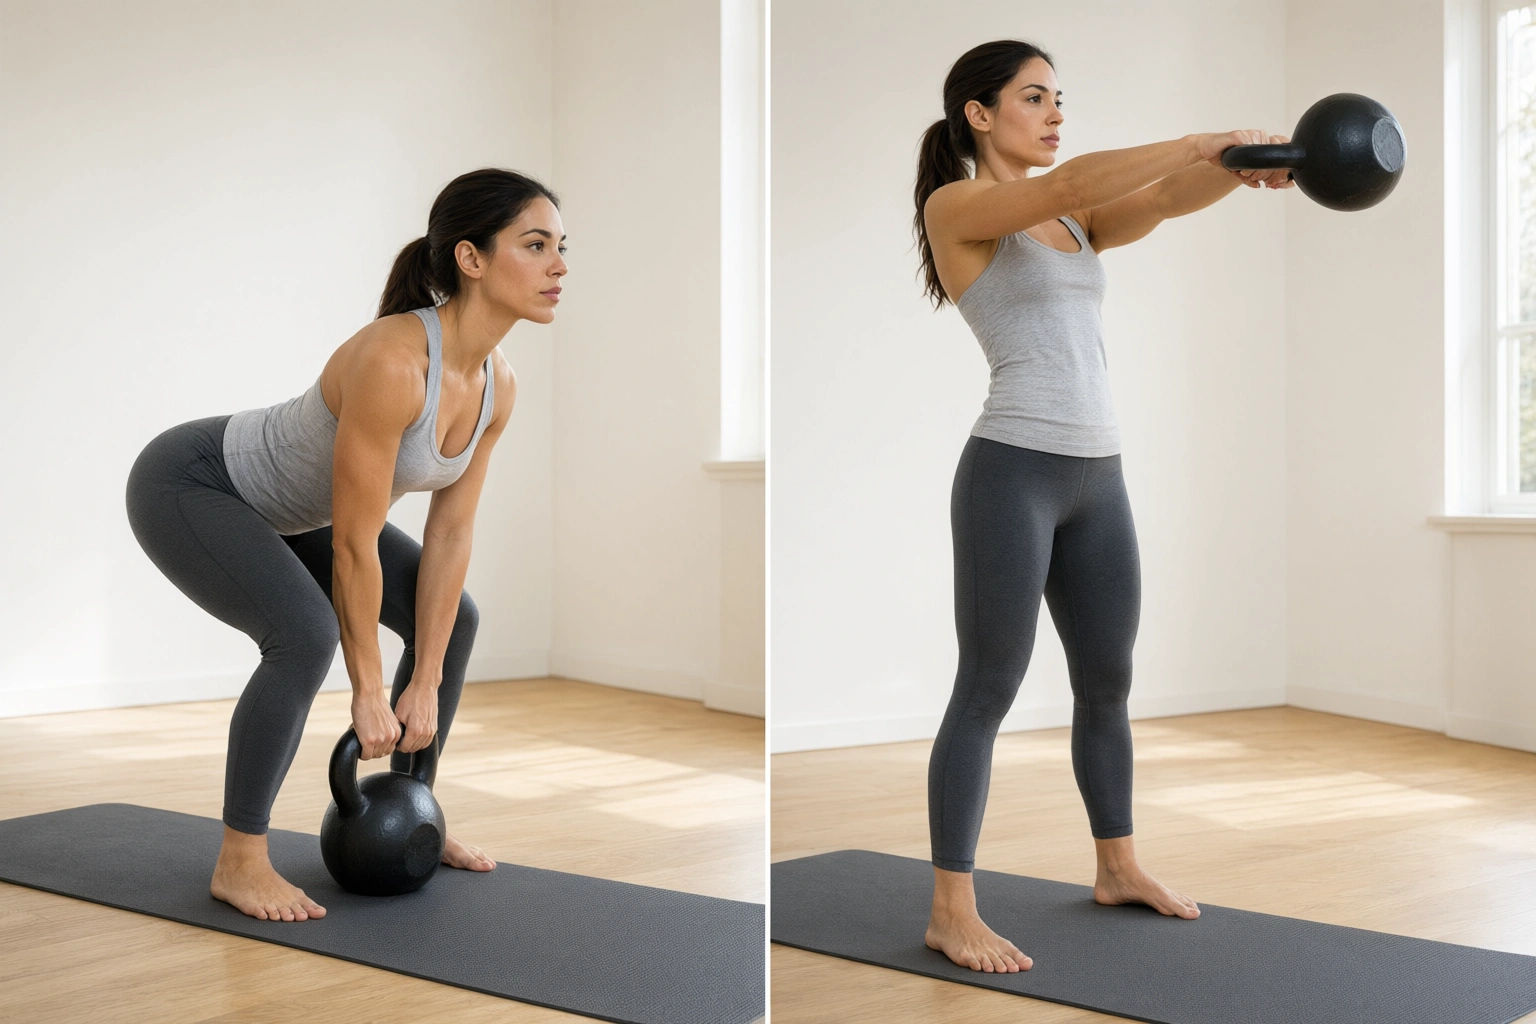
The key difference is that the swing is a hinge with speed, not a squat with a lift. If you bend your knees deeply and send the bell up with your arms, you are doing more of a squat-and-front-raise pattern than a swing.
Basic safety cues:
– Use the same hinge pattern as the deadlift.
– Keep the bell close to your body.
– Drive the movement from the hips.
– Let the arms guide the bell, not lift it.
– Stop the set if the back starts rounding or the shoulders take over.
Breathing cue: inhale as the bell comes back and you load the hinge, brace before the drive, then exhale as the hips snap forward at the top.
If the deadlift is not stable yet, the swing is too early. That is why swings are usually safer after deadlifts, not before them.
Goblet squat and press: useful, but not first if you’re unsure
A goblet squat can be a good beginner exercise once you understand how to brace and keep the torso tall. The squat fundamentals are similar to other squat variations. A kettlebell article from Nuffield Health notes that the basics of kettlebell squatting are the same as squatting with a barbell or dumbbell.
Beginner-safe goblet squat cues:
– Hold the bell close to your chest with the elbows pointed down.
– Keep the ribs stacked over the pelvis instead of leaning back.
– Sit between the hips, not straight down onto the knees.
– Keep the whole foot on the floor, especially the heels and big toes.
A press is useful too, but it asks more of the shoulder and trunk. A beginner guide from SELF recommends starting the press from the rack position, with the kettlebell at the shoulder, palm facing in, elbow bent, and the core engaged so the lower back does not arch.
Why presses should wait: pressing adds overhead stability, shoulder control, and more demand on trunk position. If your hinge, brace, and rack position are not consistent yet, the press can turn into a back-arching compensation pattern.
If you are returning after a break, deadlifts and goblet squats are usually the safer starting pair. Presses and one-handed work can wait until your control is consistent.
How to grip, hold, and breathe without losing control
Grip matters more than many beginners expect. If the bell slips in the hand, the rest of the movement usually falls apart too.
Grip and wrist position
Hold the handle firmly, but do not crush it so hard that your forearms tense up before the set begins. The hand should stay closed around the handle, and the wrist should stay in line with the forearm rather than folding back.
During cleans, presses, or rack holds, the bell should sit in a stable position rather than banging around the wrist. If the kettlebell is slamming into the forearm or forcing the wrist into a bent position, the load or movement choice is probably too advanced for the moment.
Shoulder position
Keep the shoulders organized and avoid shrugging them up toward the ears. A packed shoulder is usually more stable than a loose, floating one.
This matters especially during swings and presses. When the shoulders take over, the neck gets tense and the lower back often compensates.
Breathing
A simple beginner pattern is:
– inhale before the rep,
– brace the trunk,
– perform the rep,
– exhale as you finish or reset.
For deadlifts: inhale at the bottom before you stand, brace, stand up, then exhale near the top before the next rep.
For swings: inhale on the backswing as the bell travels between the legs, brace before driving the hips forward, then exhale at the top when the bell floats.
The point is not to force a perfect breathing method; the point is to avoid losing trunk control because you forgot to breathe at all.
Common mistakes that lead to back, shoulder, or wrist pain
Most kettlebell discomfort comes from a few predictable errors.
Rounding the lower back
This is one of the biggest risks during deadlifts and swings. It often happens when the bell is too low, too heavy, or too far away from the body.
Fix: reduce the load, bring the bell closer, and practice the hinge without weight first.
Turning the swing into a squat
If the knees bend a lot and the hips do not move back enough, the movement stops being a hinge.
Fix: think “hips back” before “bend the knees.”
Lifting with the arms
The arms should guide the bell, not create the whole lift. If your shoulders and biceps are doing most of the work, the hip drive is missing.
Fix: go back to deadlifts and practice snapping the hips forward with the bell close to the body.
Overarching the lower back at the top
Some beginners lean back at the top of the swing or press and jam the low back into extension.
Fix: finish tall, squeeze the glutes, and keep the ribs stacked over the pelvis.
Collapsing the wrist
This is common in presses and rack positions.
Fix: reduce the load and keep the forearm vertical under the bell.
How to know when a kettlebell is too heavy or technique is breaking down
Use these decision rules:
- You cannot keep the same form from the first rep to the last.
- The bell pulls you forward or makes you lose balance.
- Your back, shoulders, or wrists feel strained instead of challenged.
- You need to “muscle” the bell up with speed or body swing.
- You start dreading the next rep because the position feels unstable.
- Your grip starts failing before the intended reps are done.
- You cannot keep the rack, hinge, or brace position without compensating.
If any of those happen, reduce the weight, shorten the range, or return to the deadlift. A set that looks controlled on rep one but messy on rep four is not ready for progression.
How to progress safely to harder movements
A simple progression path looks like this:
- Two-hand deadlift
- Goblet squat and carry variations
- Two-hand swing
- One-handed variations
- Presses and overhead work
Move up only when the current exercise is repeatable and pain-free. “Repeatable” matters more than “possible once.” If you can do one decent swing but the next three are sloppy, you are not ready to progress.
This is where a video check can help. Even a quick side-angle recording often reveals whether the hinge is crisp or whether the back is compensating.
When to learn from a coach or reliable tutorial
Self-teaching is possible for basic kettlebell work, but outside feedback is useful when:
– you are unsure whether your hinge is correct,
– your back, shoulder, or wrist keeps feeling irritated,
– you want to learn swings or cleans,
– or you simply cannot tell whether the bell path looks right.
A coach can shorten the learning curve. A well-made tutorial can also help, but choose one that shows clear setup, not just fast reps. For technique education, look for sources with explicit cues and controlled demonstrations rather than highlight clips.
Frequently asked questions about safe kettlebell use
Should I start with swings or deadlifts?
For most beginners, deadlifts come first. They teach the hinge with less speed and less timing demand.
How heavy should my first kettlebell be?
Choose a weight you can deadlift with clean form for multiple reps. If your posture changes quickly, it is too heavy for learning.
Do I need two kettlebells?
No. One kettlebell is enough for beginner-safe practice and is usually easier to control.
Are kettlebells safer than dumbbells?
Neither tool is automatically safer. Kettlebells can be very beginner-friendly for hinges and carries, while dumbbells may feel more familiar for some presses and rows. The safer choice is the one you can control well.
What are the safest beginner exercises?
Two-hand deadlifts, goblet squats, and controlled carries are usually better first steps than swings, cleans, or overhead work.
How do I know if my form is unsafe?
Red flags include back rounding, shoulder shrugging, wrist collapse, loss of balance, or pain that appears during the set rather than normal muscle effort.
When to consult a professional
If you have a current injury, recurring joint pain, or a history of back or shoulder problems, get individualized guidance before loading up. A qualified coach, physical therapist, or other exercise professional can help you adapt the movement to your body and your training history.
That is especially helpful if you are returning after a long break and are unsure whether what you feel is normal deconditioning or a sign to modify the exercise.
Final thoughts
Safe kettlebell training is not about doing everything at once. It is about learning a few repeatable patterns and earning progress. If you can hinge well, brace before each rep, keep the bell under control, and stop before form falls apart, you are already doing the most important part right.