
How to Turn a Basement Into a Home Gym

A basement can be one of the best places in the house for a home gym: private, out of the way, and often large enough for a useful workout zone. But basements also come with specific challenges that other rooms do not — moisture, low ceilings, poor lighting, and noise transfer are the big ones.
The most successful basement gyms are not the most elaborate. They are the ones that solve the basic problems first, then add equipment in a way that fits the room. If you plan it properly, even an unfinished or narrow basement can become a practical training space for strength, cardio, mobility, and general fitness.
Assess Whether Your Basement Is a Good Fit
Before buying flooring or equipment, judge the basement as a space, not just a room. A workable gym needs four things: a dry environment, enough headroom for your workouts, a layout that allows safe movement, and access to power and fresh air.
A quick self-check helps narrow things down:
- Moisture: Any active leaks, standing water, or recurring damp spots need attention first.
- Ceiling height: A low ceiling may rule out some exercises or machines.
- Floor plan: You need a clear area for movement, not just space for equipment to sit.
- Air and light: A dark, stale basement will feel unpleasant fast.
If the basement is only used for walking, cycling, mobility work, or adjustable dumbbells, the space requirements are modest. If you want a power rack, pull-ups, or a treadmill, the room needs more careful planning.

A partially unfinished basement can still work well. In many cases, leaving some utility areas exposed is better than forcing a full finish that adds cost without improving training function. A simple, durable setup often beats a polished but cramped one.
Check for Moisture, Leaks, and Mold Risk First
Moisture is the main basement issue to solve before any gym build-out. If the space smells musty, shows water stains, or feels damp after rain, treat that as a warning sign rather than a cosmetic issue.
Look for:
- Efflorescence or white mineral residue on concrete walls
- Dark staining at the floor perimeter
- Rust on metal fixtures or stored items
- Peeling paint or bubbling wall surfaces
- A persistent musty odor
- Visible mold growth
If you see active water intrusion, do not install flooring over it and assume it will be fine. That often traps the problem underneath. Moisture control should come first, especially if you plan to use foam tiles, carpet tiles, or any material that can absorb or conceal dampness.
For general indoor air and mold-risk guidance, the EPA’s mold and moisture resources are a useful starting point. Local building or health departments may also have basement-specific advice.
A practical rule: if the basement still feels damp after a few days of dry weather, or if a dehumidifier fills quickly and the air still feels heavy, the space likely needs more than a cosmetic fix.
A useful humidity target is about 30% to 50% indoor relative humidity. If the basement stays in that range most of the time, has no active leaks, and does not smell musty, it is usually a better candidate for a gym build. If humidity regularly climbs above that range, or swings high after rain, plan on moisture control before installing finished flooring or expensive equipment.
Decide on Waterproofing, Dehumidification, and Ventilation
Not every basement needs a full waterproofing project, but every basement gym needs moisture control. The right approach depends on whether the problem is occasional humidity or actual water entry.
When a dehumidifier may be enough
A dehumidifier can be a good first step when the basement is dry most of the time but feels humid during warm or rainy periods, and there is no sign of active water intrusion. It helps protect equipment, reduce musty odors, and make the room feel less cold and clammy.
When more work is needed
If water enters through cracks, the floor, window wells, or wall joints, a dehumidifier alone is not a fix. You may need sealing, drainage improvements, sump pump work, or professional waterproofing guidance before building out the gym.
A simple decision rule helps:
– Use dehumidification first if the issue is mainly damp air and the basement otherwise stays dry.
– Investigate waterproofing or drainage if you see recurring puddles, wall seepage, wet corners, or moisture that returns after rain.
– Do both if the basement has minor humidity issues plus signs of occasional seepage.
Ventilation matters too
A dehumidifier removes moisture from the air. Ventilation exchanges stale air for fresher air. Those are related but not identical jobs. In a basement gym, both can matter. If the room is enclosed and you work out there regularly, stale air and odor buildup can become a problem even when humidity is under control.
If you are considering HVAC changes, electrical upgrades, or major waterproofing, check with local building officials first. Permits and code requirements vary, and some changes may need professional installation.
Measure Ceiling Height and Map the Workout Layout
Ceiling height affects what kind of gym you can build more than most people expect. A basement with limited headroom can still support an effective setup, but it may not be the right place for every exercise.
Measure the usable height in several spots, not just one. Be sure to account for:
- Ducts, beams, pipes, and light fixtures
- Floor buildup from subflooring or mats
- The height of your shoes or platform if you lift on one
Then map the room into zones. Even a small basement works better when the space is assigned a purpose.
Simple zone planning
- Strength zone: Dumbbells, bench, rack, or all-in-one trainer
- Cardio zone: Folding treadmill, bike, rower, or jump rope area
- Mobility zone: Open floor for stretching, yoga, or floor work
- Storage zone: Wall-mounted hooks, shelves, or compact cabinets
If the ceiling is low, prioritize floor-based and seated exercises. That may mean choosing a rowing machine, exercise bike, or compact strength setup instead of overhead pressing or pull-up-heavy training. If you want a rack, measure not only the rack height but also the movement path above your head.
For especially low ceilings, a practical example is a setup built around adjustable dumbbells, a flat bench, and a bike or rower, with no pull-up bar at all. In a room with just enough clearance for standing work but not overhead lifting, that kind of layout is often more usable than forcing a full rack into the space.
For a narrow basement, try placing the rack or dumbbell storage along one long wall and keeping the center strip open for movement. A folding treadmill against the far wall or a single compact cardio machine in one corner usually works better than spreading several machines across the room.
Choose the Right Flooring for a Basement Gym
Flooring does more than protect the concrete. It affects comfort, noise, moisture handling, and how safe the room feels underfoot.
Rubber flooring vs foam tiles vs carpet tiles
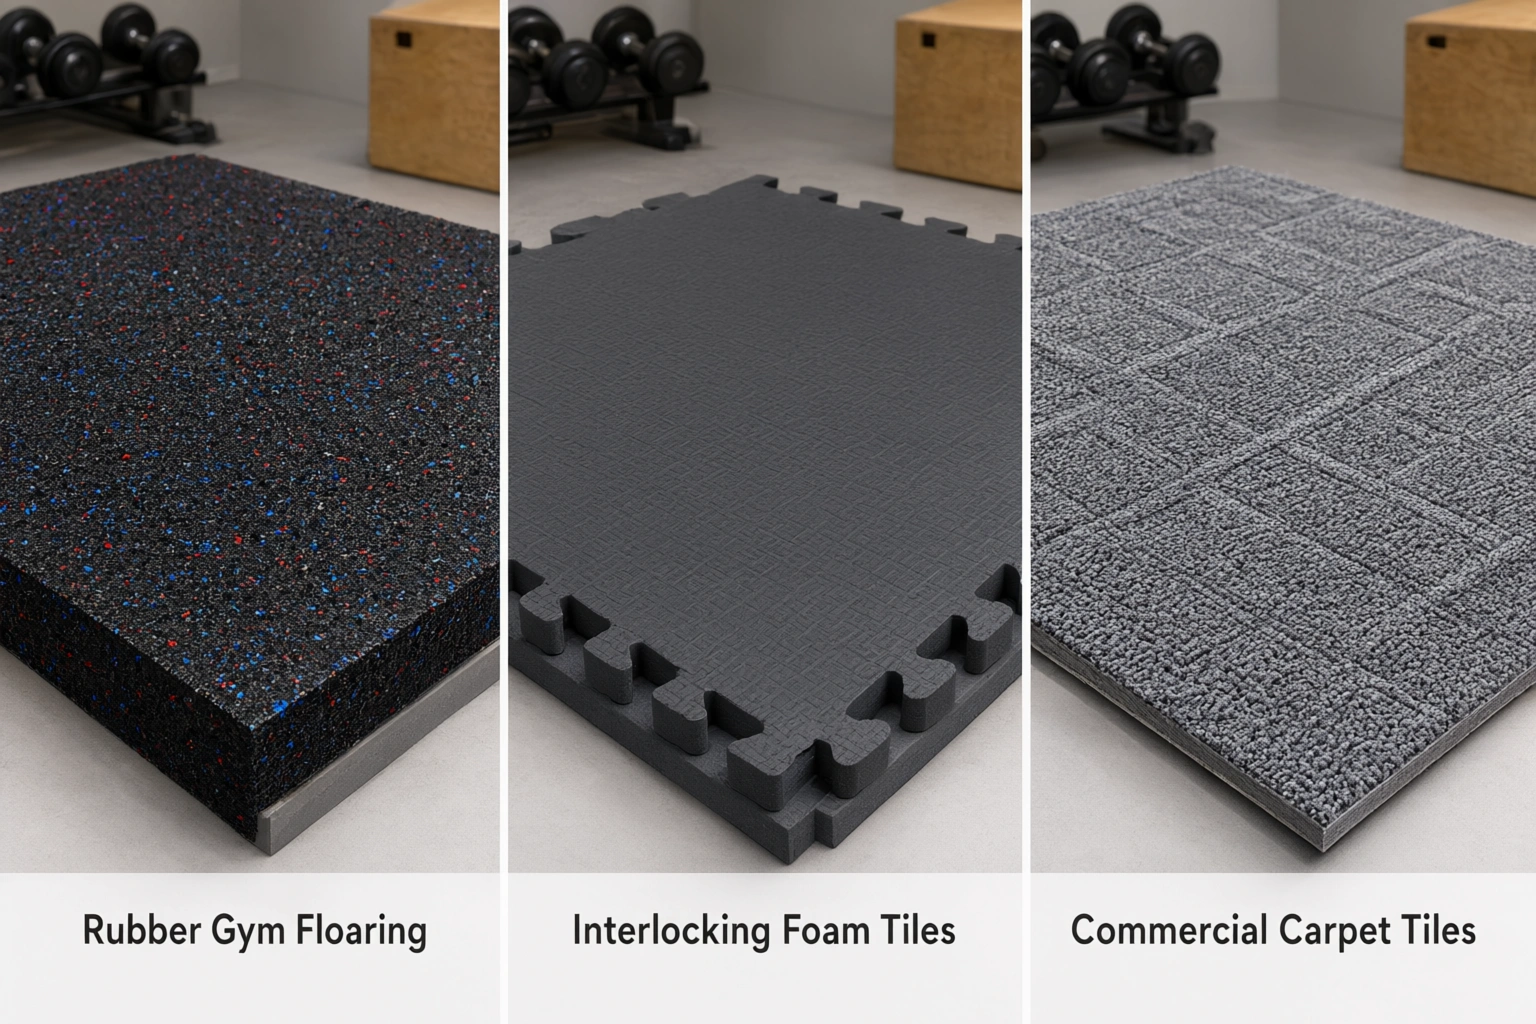
| Flooring type | Best for | Main advantages | Main trade-offs |
|---|---|---|---|
| Rubber gym flooring | Strength training, durability, noise reduction | Durable, stable, moisture-resistant, good for weights | Heavier, usually more expensive than foam, can be harder to install neatly |
| Foam tiles | Light workouts, stretching, temporary setups | Soft, inexpensive, easy to install | Less durable, less stable for heavy weights, can compress over time |
| Carpet tiles | Finished-looking multipurpose rooms | Softer feel, easier to replace individual tiles | Less moisture-friendly, not ideal if dampness is a concern |
For many basement gyms, rubber gym flooring is a strong all-around choice if you plan to lift weights, need better noise control, and the basement is reasonably dry. Foam tiles make sense for a low-cost, temporary, or mobility-focused setup, but they are not the best match for heavy lifting. Carpet tiles are usually the least attractive option in a basement with any moisture risk.
A subfloor may also be worth considering if the concrete is cold, uneven, or slightly damp. Just make sure any layered flooring system does not trap moisture underneath.
Plan Lighting, Electrical Access, and Airflow
Basements often feel worse than they are because the lighting is poor. Bright, even light makes the room more usable and less cramped.
Lighting
Use layered lighting if possible:
- Overhead lighting for general brightness
- Task lighting near mirrors, racks, or benches
- Portable lighting only as a supplement, not the main source
Cooler, brighter light usually works better in a gym than a single dim bulb. If the basement has small windows, do not rely on them as the main light source.
Electrical access
Powered equipment such as treadmills, rowers, fans, and dehumidifiers may need more planning than a simple dumbbell setup. Avoid running extension cords across walkways. If the room needs new outlets or circuit work, consult a qualified electrician and check local code requirements.
Airflow
Even a well-lit basement can feel stale during workouts. A fan, open doorway, or ventilation improvement can make the space more comfortable. If humidity is a concern, pair airflow with dehumidification rather than treating one as a substitute for the other.
Choose Basement-Friendly Equipment
The best basement gym equipment is compact, versatile, and suited to your ceiling height and layout. You do not need a full commercial-style setup to train effectively.
Good options for most basements
- Adjustable dumbbells: Replace a full rack of fixed weights and save a lot of floor space.
- Adjustable bench: Supports pressing, rows, step-ups, and seated work.
- Foldable treadmill or compact bike: Useful if you want cardio without a large footprint.
- Rowing machine: Strong option for cardio in lower-ceiling basements because it stays low and folds in some models.
- Power rack: Great if the ceiling height and floor space allow it, but measure carefully before buying.
- All-in-one trainer: Can replace several separate pieces if you want more function in less space.
Free weights vs compact all-in-one equipment
Free weights offer more flexibility and often cost less to start, but they need more open space and storage. Compact all-in-one systems reduce clutter and can work well in narrow basements, though they may cost more upfront and limit exercise variety.
If the basement is small, choose equipment that can serve multiple roles. Adjustable dumbbells plus a bench often cover more training than a room full of single-purpose machines.
Use Storage to Keep the Space Open and Safe
Storage is what keeps a basement gym functional after the first month. Without it, equipment spreads into walkways and the room starts to feel smaller than it is.
Wall-mounted storage vs freestanding storage
Wall-mounted storage is usually the better fit for a basement gym because it preserves floor space and keeps items visible. Think hooks, shelves, plate storage, or mounted holders for bands and accessories.
Freestanding storage can be useful if you rent, cannot drill into walls, or need flexibility. The downside is that it takes up more floor area and can become another obstacle in a tight room.
A simple storage rule works well: anything used every session should be easy to reach, and anything rarely used should not sit in the middle of the room. Keep the floor clear where you actually move.
Reduce Noise, Vibration, and Impact Transfer
Basement gyms can create noise that travels through the house, especially if the gym sits under a living room or bedroom. The goal is not silence; it is control.
Rubber flooring helps with impact noise, but it is not the whole solution. If you lift weights, place them down deliberately and avoid dropping them unless the floor system is built for it. For cardio machines, check that the machine sits level and does not wobble.
If vibration is an issue, consider:
- Rubber mats under machines
- A heavier floor surface for lifting areas
- Separating cardio equipment from the wall shared with living spaces
- Avoiding loose equipment that rattles
For shared homes or multi-unit buildings, noise and vibration deserve the same planning attention as moisture. A basement gym that sounds fine during the day may still be disruptive at night.
Build the Gym in Phases to Match Your Budget
A basement gym does not need to be completed all at once. Phasing the build often leads to better decisions and fewer wasted purchases.
Example budget ranges
These are broad planning ranges, not fixed prices, since costs vary by room size, existing condition, and equipment choices:
-
Basic setup: about $500 to $2,000
Usually covers moisture checks or a dehumidifier, simple flooring in part of the room, adjustable dumbbells or a few core pieces, and basic storage. -
Mid-range setup: about $2,000 to $6,000
Often includes better flooring coverage, a bench, more storage, one cardio machine, improved lighting, and possibly a rack or more complete strength setup. -
More complete setup: about $6,000 and up
May include broader flooring coverage, multiple machines, upgraded lighting, electrical or ventilation work, and a more finished look.
Phase 1: Make the room usable
Focus on the basics:
– Moisture control
– Lighting
– Flooring in the main workout area
– One or two core pieces of equipment
Phase 2: Improve function
Add:
– Storage
– A bench
– Mirrors if they help with form and make the room feel larger
– Better airflow or a fan
Phase 3: Expand if needed
Add:
– Rack or machine upgrades
– More cardio options
– Specialized accessories
– Finishing touches for comfort
This approach is especially useful if you are not yet sure how much you will use the space. It also reduces the risk of buying equipment that does not fit the layout once the room is actually in use.
Avoid the Most Common Basement Gym Mistakes
A few mistakes show up again and again in basement gym projects:
- Skipping moisture checks: This is the fastest way to damage flooring and equipment.
- Overcrowding the room: More equipment does not equal a better gym if you cannot move safely.
- Choosing the wrong flooring: Soft flooring may feel comfortable but fail under weights.
- Ignoring ceiling clearance: A rack or pull-up bar can become unusable if the ceiling is too low.
- Neglecting ventilation: A gym that feels stuffy will be used less often.
- Using poor storage: Clutter makes a basement feel smaller and less safe.
- Buying too much too soon: It is better to build around the workouts you actually do.
If you are unsure about drainage, wiring, or structural load, that is the point to bring in a professional rather than guessing.
Sample Basement Gym Setups for Different Spaces
Small unfinished basement
Use rubber flooring in one open area, adjustable dumbbells, a bench, and wall-mounted storage. This setup keeps the room simple and leaves space for warm-ups or floor work.
Low-ceiling basement
Skip tall racks and overhead-focused movements if clearance is tight. Build around a bike, rower, dumbbells, bench work, and mobility space. This is often the best fit when headroom is limited. In very low areas, it can help to keep the tallest equipment under the highest part of the ceiling and reserve the lower-clearance section for mats or storage.
Narrow basement
Place equipment along one wall and keep the center line open. A folding treadmill or compact cardio machine works better than several wide machines. Vertical storage is especially useful here. If the room is long and narrow, a one-wall layout with a clear walking lane down the middle often feels more comfortable than trying to build two full workout zones.
Shared family basement
Split the room into zones. One side can hold cardio and strength equipment, while another corner stays open for stretching, kids’ activities, or general use. Modular storage helps the space adapt over time.
Finished Basement Gym vs Unfinished Basement Gym
A finished basement gym can feel more comfortable, but it is not always the better choice.
Finished basement gym
- Cost: Usually higher because you are paying for walls, ceilings, trim, and finished surfaces
- Comfort: Often better for lighting, temperature control, and overall appearance
- Moisture risk: Can be harder to spot leaks or dampness once the space is enclosed
Unfinished basement gym
- Cost: Usually lower because you can focus on the workout area instead of full-room finishing
- Comfort: Often less polished, but still very functional with good lighting and flooring
- Moisture risk: Easier to inspect for leaks, stains, and dampness before they become hidden problems
A partially unfinished basement can still work well if the workout area is dry and comfortable enough for regular use. In many cases, leaving some utility areas exposed is better than forcing a full finish that adds cost without improving training function.
When to Consult a Professional
Some basement gym projects are simple. Others involve real building and safety issues. Get professional help if you are dealing with:
- Persistent leaks or suspected foundation problems
- Mold that keeps returning
- Electrical changes or new circuits
- HVAC or ventilation modifications
- Structural questions about heavy equipment or platforms
- Permit requirements for finishing work
If the basement is part of a rental, condo, or shared building, check with the property owner or association before making permanent changes.
FAQs
Is an unfinished basement okay for a home gym?
Yes, if it is dry, reasonably safe, and laid out well. Many people use unfinished basements successfully because they are easier to clean and more flexible for equipment placement.
What should I do first before setting up the gym?
Check for moisture, leaks, and mold risk first. After that, measure ceiling height and floor space before buying flooring or equipment.
What flooring is best for a basement gym?
Rubber gym flooring is often a strong choice if you plan to lift weights, need noise control, and the basement is reasonably dry. Foam tiles are softer and cheaper, but less durable. Carpet tiles are generally less suitable if moisture is a concern.
How do I make a basement gym less damp?
Use a dehumidifier, improve ventilation if possible, and fix any water intrusion before installing flooring. If the basement stays damp, sealing or waterproofing work may be needed.
Can I put a power rack in a basement?
Possibly, but only if the ceiling height and floor space allow safe use. Measure carefully and account for overhead movement, attachments, and surrounding clearance.
What if my basement ceiling is too low?
Focus on floor-based training, seated cardio, compact machines, and dumbbell work. Low ceilings can still support a very effective gym if you choose the right equipment.
How can I reduce noise from a basement gym?
Use rubber flooring, keep equipment stable, avoid dropping weights, and separate noisy machines from shared walls when possible.
Is it cheaper to finish the basement first?
Not always. A partially unfinished gym can be more practical and less expensive if your main goal is function rather than a fully finished living space.
How much equipment do I really need?
Usually less than people expect. Many basement gyms work well with adjustable dumbbells, a bench, a mat, and one cardio machine.
What is the biggest mistake people make?
Ignoring moisture. If the basement is not dry and stable, every other upgrade becomes harder to maintain.