
Home Gym Setup in a Shed: A Practical Guide to Planning, Building, and Using the Space

A shed can work well as a compact home gym, but only if the space is treated like a small building project rather than a room full of equipment. The biggest mistakes happen before the first dumbbell arrives: the shed is too small, the floor is too weak, the air gets damp, or the electrical setup is not planned for actual use.
A good shed gym is usually simple, durable, and matched to one training style. That might mean a strength-focused setup with a rack and barbell, a cardio and mobility room, or a flexible space with adjustable dumbbells and a folding bench. The goal is not to fit everything. The goal is to build a space that stays safe, usable, and comfortable through changing weather.
Can a Shed Work as a Home Gym?
Yes, in many cases, but not every shed is a good candidate. The best shed gyms are usually those with a solid foundation, enough ceiling height for the intended exercises, manageable moisture, and a structure that can support the equipment you want to use.
A shed is often a better fit when you want:
– A private workout space separate from the house
– A compact setup with limited equipment
– A project you can improve in phases
– A place for lifting, mobility work, or cardio without disturbing the rest of the home
A shed is usually a poor fit when:
– The floor is uneven, soft, or visibly deteriorating
– The foundation is cracked, sinking, or badly out of level
– The roof is too low for overhead pressing, pull-ups, or a rack
– Moisture is already a problem
– You need a large treadmill, multiple machines, or a full commercial-style layout
– The shed cannot realistically support electrical upgrades or safe heating/cooling
A useful way to think about it: if the shed can become a practical workout room without major structural uncertainty, it may be worth converting. If it needs major repair before it can hold basic furniture, it is better to fix the structure first or use a different space.
Shed gym vs garage gym
A shed gym is usually better when you want separation from the house, a dedicated project space, or a setup that does not compete with cars and storage. A garage gym is often easier when you want more floor area, better access to power, and a structure that is already closer to a finished utility space.
In general:
– Choose a shed gym if you want a compact, private setup and are willing to improve the building
– Choose a garage gym if you want easier electrical access, more forgiving ceiling height, and less structural uncertainty
For code, zoning, and permit questions, check your local building department before you buy equipment or start finishing the interior. In the U.S., the International Code Council is a useful reference point for building-code context, but local rules still control what is allowed on your property.
Is My Shed Big Enough?
A shed can look large enough on paper and still feel cramped once you add a rack, a bench, and a person moving a bar overhead. The easiest way to judge fit is to match the shed to the training style you actually want.
Practical minimum dimensions by setup
These are rough planning benchmarks, not universal rules:
- Basic dumbbell or mobility setup: about 6 x 8 ft to 8 x 10 ft
- Works for adjustable dumbbells, a folding bench, bands, and floor work
-
Ceiling height is less critical, but taller is still better for comfort
-
Compact rack or squat stand setup: about 8 x 10 ft to 10 x 12 ft
- Gives enough room for a rack, bench, and some plate storage
-
A ceiling height of roughly 8 ft or more is often more practical, especially if you want pull-ups or overhead work
-
Treadmill or cardio-focused setup: about 8 x 10 ft minimum, with more room preferred
- Many treadmills need extra clearance behind and around the machine
-
Ceiling height should allow the user to stand upright comfortably, with some buffer above the head
-
Mixed gym with rack, bench, and open floor space: about 10 x 12 ft or larger
- Better if you want a more flexible layout with lifting and movement space
- A higher ceiling is helpful if you plan to press overhead or use a pull-up bar
Ceiling-height guidance
Ceiling height matters more than many people expect. For a rack-based shed gym, a low ceiling can make the space feel limiting even if the floor area seems adequate.
As a rough guide:
– About 7 ft or less: usually tight for a rack, pull-ups, or overhead pressing
– About 8 ft: workable for many compact setups, depending on the user and equipment
– Above 8 ft: more comfortable for mixed training and overhead movement
If you plan to lift overhead, measure from the floor to the lowest obstruction, not just the roof peak. Be aware of beams, sloped ceilings, and light fixtures.
Measure the Space and Check Structural Limits
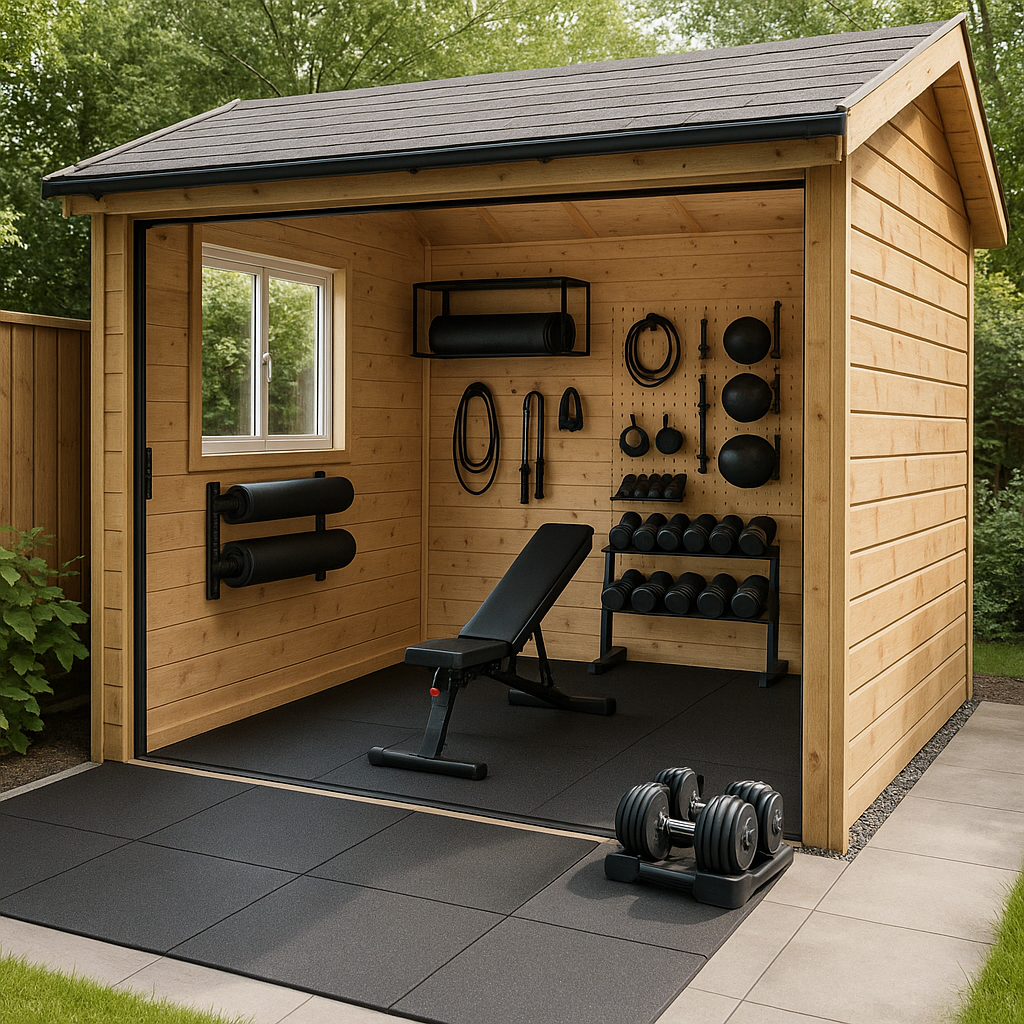
Before choosing equipment, measure the shed as if every inch matters. Use the actual usable interior dimensions, not the advertised size. Wall framing, insulation, storage, and door swing all reduce the space you can train in.
Measure more than floor area
Record these numbers:
– Interior length and width
– Ceiling height at the lowest point
– Door opening width and height
– Any sloped roof areas that reduce headroom
– Space taken by built-in shelves, posts, or framing
Check floor load, foundation condition, and structure
A shed floor that works for storage may not be ideal for lifting. Heavy equipment concentrates load in small areas, especially under racks, benches, and cardio machines. It helps to think about two kinds of loading:
- Distributed load: weight spread across a larger area, such as people moving around or equipment on a wide base
- Point load: weight concentrated in a small area, such as rack feet, a treadmill base, or a loaded dumbbell dropped in one spot
If the floor flexes, squeaks, sags, or shows rot, address that before adding gym gear. Also check the foundation itself, because a strong floor on a poor base can still fail over time.
Look for:
– Soft spots in the subfloor
– Water damage around edges and door thresholds
– Joists that appear undersized or damaged
– Signs the foundation is settling unevenly
– Cracks, shifting, or exposed deterioration under the shed
If you are unsure about floor load capacity or structural integrity, a contractor or structural professional can help evaluate whether reinforcement is needed. That is especially important if you plan to use a power rack, bumper plates, or any machine with a large footprint and concentrated weight.
Leave room for movement
A shed can be “big enough” for equipment but still too tight for safe training. You need room to step back, load plates, move around a bench, and exit without clipping walls or shelves. If the layout only works when you stand perfectly still, it is too crowded.
Choose the Right Training Style for the Shed
The shed should shape the training plan, not the other way around. A small shed can support excellent workouts, but it usually works best when the equipment matches one primary use.
Strength-focused setup
This is the most space-efficient option if you want serious resistance training. A compact rack or squat stand, a barbell, plates, and a bench can cover a lot of ground. The trade-off is clearance: strength setups need more room around the bar path and more ceiling height than people expect.
Best for:
– Squats
– Bench press
– Deadlifts
– Overhead pressing, if the ceiling allows
Cardio and mobility setup
If the shed is narrow or has limited structural capacity, cardio and mobility may be easier to support. A treadmill, bike, rower, or open mat space generally asks less from the floor than a heavy lifting setup. The downside is that cardio equipment often consumes more continuous floor space than a simple strength corner.
Best for:
– Walking or running in place
– Low-impact conditioning
– Stretching and floor work
– Warm-ups and recovery sessions
Mixed setup
A mixed setup works when you keep equipment compact and avoid machine-heavy choices. Adjustable dumbbells, a folding bench, resistance bands, and a mat can support a wide range of training without overwhelming the shed. This is often the most practical choice for sheds with modest dimensions.
Plan a Layout That Fits the Shed
A shed gym works best when the layout is simple and disciplined. In a narrow room, the easiest way to create a safe setup is to treat one wall as the main training wall and keep the opposite side open.
Use zones, not clutter
Think in three zones:
– Lifting zone: rack, bench, barbell, or dumbbells
– Movement zone: open floor for warm-ups, mobility, and bodyweight work
– Storage zone: plates, bands, mats, and small accessories
Keep storage off the floor whenever possible. Wall-mounted shelves or compact vertical storage reduce tripping hazards and make the room feel larger.
Two useful layout patterns
1. Rack on one end, open floor in front
This works well in a rectangular shed. Put the rack at the far end so you can step forward into open space. It is a strong choice for a strength-first setup.
2. Equipment along one wall, open center lane
This is better for narrow sheds. A treadmill, bike, or dumbbell storage can line one wall while the middle remains free for movement.
A practical rule: if you cannot walk from the door to the back of the shed without weaving around equipment, the layout is too dense.
Pick Equipment That Matches the Space
The best shed gym equipment is compact, versatile, and easy to move or store. The wrong equipment can make a shed feel overcrowded fast.
Space-saving equipment that usually works well
- Adjustable dumbbells
- Folding bench
- Resistance bands
- Kettlebells
- Medicine ball
- Compact rack or squat stand
- Wall storage for plates and accessories
- Floor mat or lifting platform section
These items are useful because they support multiple exercises without requiring separate machines for each movement.
Equipment that needs more caution
- Full-size treadmills
- Large cable machines
- Multi-station strength machines
- Tall power racks in low-ceiling sheds
- Fixed benches that cannot be moved
A treadmill can work in a shed, but it often demands more space, better ventilation, and more reliable power than people expect. A rack-based setup is usually more efficient if strength training is the priority.
Portable vs fixed equipment
Portable equipment gives you flexibility. You can clear floor space, rearrange the room, and adapt the gym over time. Fixed equipment can feel more stable and efficient, but it locks the layout in place and may limit future changes.
If you are starting from scratch, portable gear is usually the safer first step. Add fixed equipment only after you know how you actually use the space.
Choose Flooring and Underlayment
Flooring is one of the most important parts of a shed gym because it affects comfort, noise, moisture, and equipment stability.
Rubber flooring vs foam mats vs carpet tiles
Rubber gym flooring
Rubber is usually the best all-around choice for a shed gym. It is durable, easier to clean, and more stable under weights. It also handles dropped dumbbells and heavy foot traffic better than softer materials.
Foam mats
Foam mats are cheaper and comfortable for floor work, but they compress more easily and are not ideal under heavy lifting. They can shift, dent, or feel unstable under racks and benches.
Carpet tiles
Carpet tiles can soften the room and reduce noise, but they are not the best choice where sweat, moisture, or heavy equipment are involved. They can hold odors and are harder to keep dry if the shed has condensation issues.
Why many shed gyms use a layered floor
A common approach is a simple subfloor or moisture barrier, then rubber flooring on top. In some setups, a plywood subfloor helps level the surface or spread load more evenly before the top layer goes down. The exact build depends on the condition of the shed floor and how heavy the equipment will be.
If the shed is damp or uneven, flooring alone will not solve the problem. Fix the moisture source and structural issues first.
Handle Insulation, Ventilation, Heating, and Cooling
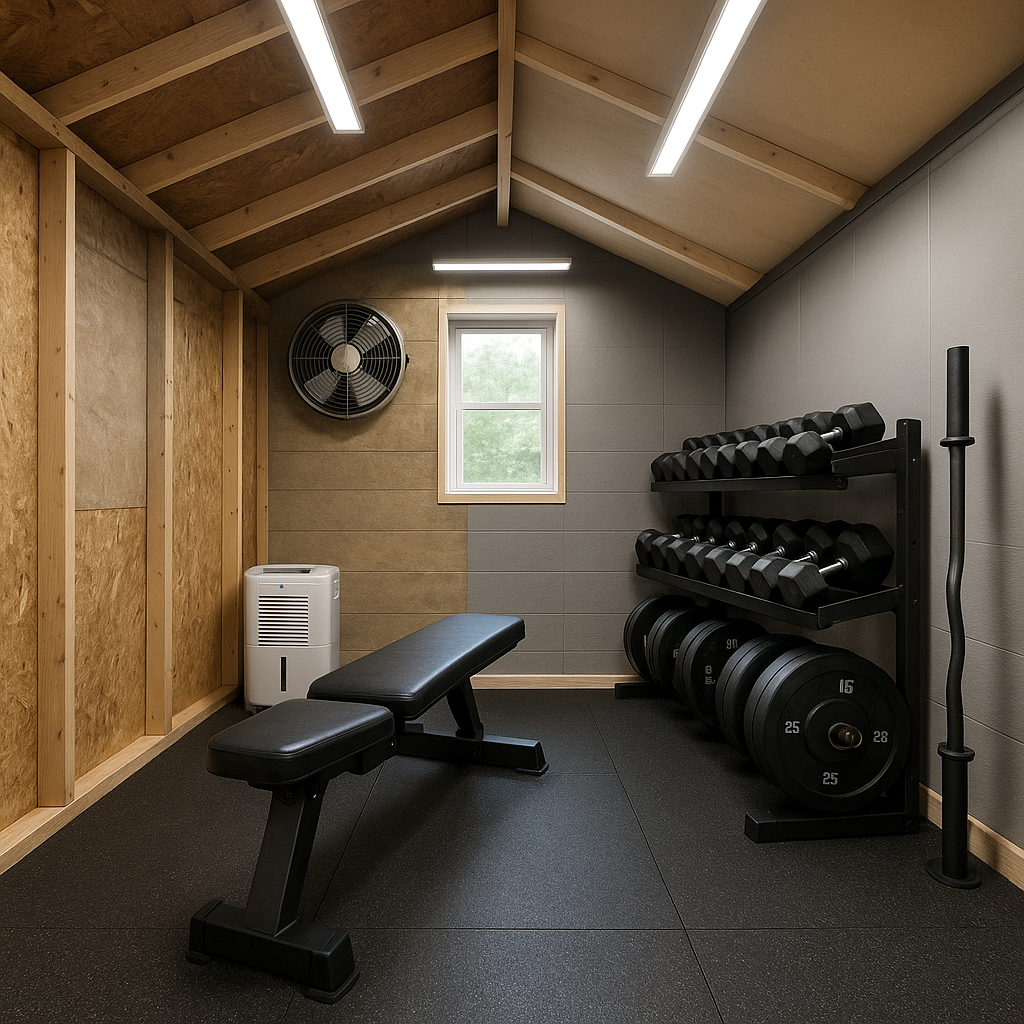
A shed gym without climate control can be usable in mild weather but uncomfortable or damaging in extreme conditions. Temperature swings also create condensation, which leads to rust, mildew, and unpleasant air quality.
Insulation vs no insulation
Insulation improves comfort and helps reduce temperature swings. It can also support moisture control when paired with ventilation and weather sealing. The trade-off is cost and lost interior space.
A lightly used, seasonal shed gym may not need full insulation. In a mild climate, weather sealing and ventilation may be enough. But if you want year-round use, insulation becomes much more valuable.
Low-cost options to improve comfort
Before committing to a full insulation project, consider simpler steps:
– Seal gaps around doors and windows
– Add weather stripping
– Use a fan for air movement
– Install a dehumidifier if moisture is the bigger issue
– Add insulated curtains or temporary wall panels in some cases
– Use a portable heater or portable cooling unit only if it is safe for the shed and power setup
These lower-cost fixes can be enough for a shed gym that is used seasonally or for shorter workouts.
When insulation is worth it
Insulation is usually worth the cost when:
– You want to use the shed year-round
– The shed overheats or gets too cold for regular workouts
– Condensation is a recurring problem
– You plan to finish the interior and keep equipment in place long term
If you only expect occasional training in moderate weather, ventilation alone may be enough to start.
Ventilation matters even in cooler weather
Fresh air helps manage heat buildup, odors, and moisture. A fan or vent can make the shed more usable during workouts and reduce the chance of damp air sitting inside after you finish.
If the space is fully enclosed, think about how air enters and exits the shed. A dehumidifier may also help in humid climates or in sheds that tend to trap moisture after rain.
Heating and cooling
If you plan to work out in hot summers or cold winters, some form of heating or cooling may be needed. That could mean a small HVAC solution, a safe space heater used with caution, or a portable cooling unit depending on the shed and local conditions.
For electrical and safety guidance, use official product manuals and local code guidance. The U.S. Consumer Product Safety Commission is a useful source for general consumer safety information, especially around heaters, cords, and household hazards.
Plan Electricity, Lighting, and Safety
A shed gym needs more than a single light bulb if you want it to feel safe and usable. Good lighting reduces trip hazards and makes lifting more comfortable. Power planning matters even more if you add fans, a dehumidifier, or cardio equipment.
What to plan for
- LED lighting for general illumination
- Enough outlets for charging, fans, and equipment
- Safe cord routing if temporary power is unavoidable
- Dedicated space for electronics away from sweat and moisture
For a practical shed gym, plan the outlet layout around how you will actually train. A common approach is to place outlets near:
– The rack or lifting zone
– The cardio equipment zone
– A storage or charging area near the entrance
As a rough planning target, many small shed gyms work better with at least a few well-placed outlets rather than one outlet serving the whole space. Think about outlet count before finishing the walls, because adding them later is usually more difficult.
Circuit planning and protection
Do not assume the existing shed wiring can handle everything. A treadmill, heater, fan, and lighting can add up quickly. If the shed has old wiring or limited service, have an electrician evaluate the setup before you rely on it for regular workouts.
Also consider:
– Whether the shed needs a dedicated circuit for heavier loads
– GFCI protection where required by local code or where moisture is a concern
– How lighting and outlets will be split across circuits so one device does not overload the whole space
Avoid running extension cords as a permanent solution. They are fine for short-term use in some cases, but they are not a substitute for proper outlets and safe wiring.
When to hire an electrician
Hire a licensed electrician if you are:
– Adding new circuits or a subpanel
– Upgrading an old or undersized electrical system
– Installing outlets near moisture-prone areas
– Planning a treadmill, heater, dehumidifier, or multiple powered devices
– Unsure whether the shed wiring meets local code
If the project involves new dedicated power, it is usually not a DIY guess-and-check job. Electrical work is one of the clearest places to bring in a professional.
Prevent Moisture, Mold, and Rust
Sheds are naturally more exposed to outdoor humidity, rain, and temperature changes than a garage or indoor room. That makes moisture control a major part of any shed gym plan.
Common moisture problems
- Condensation on metal equipment
- Damp flooring or wall framing
- Musty odor after rain
- Mold on soft materials or stored accessories
- Rust on barbells, plates, and hardware
Practical prevention steps
- Seal gaps around doors and windows
- Repair roof leaks before finishing the interior
- Use a moisture barrier where appropriate
- Improve ventilation
- Run a dehumidifier if the climate calls for it
- Store plates and bars off the floor when possible
A simple maintenance routine helps a lot. Wipe down bars and handles after use, keep towels dry, and check corners and thresholds after heavy rain. If you notice recurring condensation, the shed needs better airflow or moisture control rather than just more cleaning.
Budget the Conversion in Phases
A phased build is often the smartest way to handle a shed gym. It lets you solve the problems that affect safety and usability first, then add comfort and equipment later.
Phase 1: Make the shed usable
Focus on:
– Cleaning and sealing
– Basic flooring
– Lighting
– Essential ventilation
– A few compact pieces of equipment
Rough budget range: about $300 to $1,500+, depending on shed condition and how much you do yourself. A very basic refresh can stay at the low end, while better flooring and lighting can push the cost higher.
This phase gets you working out without committing to a full renovation.
Phase 2: Improve comfort and durability
Add:
– Insulation
– Better weather sealing
– Dehumidification
– More storage
– Electrical upgrades if needed
Rough budget range: about $1,000 to $5,000+. The total depends heavily on shed size, insulation type, and whether you need professional electrical work.
This stage is about making the shed easier to use year-round.
Phase 3: Expand the training setup
Add:
– Rack or stand
– More plates or dumbbells
– Mirror
– Cardio equipment
– Wall-mounted organization
Rough budget range: about $500 to $3,000+ for equipment, with much more possible if you buy higher-end machines. A compact dumbbell-based setup will usually cost less than a rack plus treadmill combination.
Simple example budget buckets
To estimate a realistic build, many readers find it helpful to think in buckets:
– Flooring: low hundreds to over a thousand dollars, depending on material and coverage
– Insulation and sealing: a few hundred dollars for modest fixes, more for a full finish
– Lighting and outlets: a few hundred dollars for simple upgrades, more if an electrician is needed
– Ventilation and moisture control: from a basic fan to several hundred dollars for a dehumidifier or better airflow setup
– Equipment: highly variable, from a few hundred dollars for compact gear to several thousand for a more complete gym
Budgeting by phase helps you avoid buying the wrong equipment too early. It also gives you time to see whether the shed actually supports the training style you want.
Know the Safety and Permit Issues
Before converting a shed into an occupied workout space, check the rules that apply to your property. Some sheds are fine for storage but may need approval if they are being used as a more permanent room.
What to verify
- Local building permits
- Electrical permit requirements
- Zoning rules
- HOA restrictions, if applicable
- Fire safety and emergency access
- Whether the shed’s use changes its legal classification
If you are adding insulation, wiring, or major interior finishes, permits may be required even if the exterior stays the same. If the shed is close to property lines or has limited exits, local rules may also affect what is allowed.
When to consult a professional
Bring in a professional if:
– The floor feels weak or uneven
– You want to install new electrical service
– You plan to mount heavy equipment
– The shed has water damage or structural wear
– You are unsure whether the project needs permits
That is especially true if you want a rack, a treadmill, or any setup that depends on stable flooring and reliable power.
Example Shed Gym Setups by Space and Budget
Small shed, simple strength setup
A compact shed can still work as a basic strength room if you keep the equipment tight:
– Adjustable dumbbells
– Folding bench
– Resistance bands
– Wall storage
– Rubber flooring
This setup works well when the main goal is efficient training without a large footprint.
Medium shed, rack-based setup
A larger shed can support:
– Power rack or squat stand
– Barbell and plates
– Bench
– Rubber flooring with a stable lifting area
– Fan or dehumidifier
This is the better choice if strength training is the priority and the shed has enough ceiling height and floor support.
Narrow shed, cardio and mobility setup
If the layout is long and narrow, a treadmill or bike on one side with open floor space on the other may be more practical than a rack. Add mats, a mirror, and compact storage for a flexible conditioning room.
Damp shed, phased conversion
A shed with moisture issues should usually be handled in stages:
1. Weather seal and repair leaks
2. Add ventilation and moisture control
3. Install flooring
4. Add basic lighting and outlets
5. Bring in equipment gradually
That sequence protects the structure before you spend heavily on gear.
Next Steps Before You Buy Equipment
Use this quick checklist before you start shopping:
– Measure the usable interior space and lowest ceiling height
– Check the floor, foundation, and roof for damage or sagging
– Decide whether the shed fits your training style or whether a garage is a better option
– Plan ventilation, heating, cooling, and moisture control
– Count outlets, check circuit capacity, and call an electrician if new wiring is needed
– Confirm permit and zoning requirements before finishing the space
– Set a phase-by-phase budget so you do not overspend on equipment too early
If the shed passes those checks, you will be in a much better position to build a gym that is safe, comfortable, and actually usable.